Learn about the “Extra Fields” feature on Joomla and K2. It can help you customize your Joomla-based website!
About Extra Fields
What are they?
- Extra fields in Joomla and K2 are exactly what the name suggests. They are extra fields that are added when a feature or content is not compatible with the traditional K2 Item layout.
Best Use Case Scenarios
- Often times, the traditional K2 Item layout is not suitable for showing all information within a K2 Item. A certain feature of a website may not be well implemented in the title, content, or image fields. In this case you may consider using extra fields.
- Some examples of extra fields may be icons that link to your social media pages or a subtitle to go under your title.
- Once an extra field is created, you can use that extra field on any item you choose. Therefore, extra fields are often times very useful when you want a uniform feature on several items.
How To Use Extra Fields
Creating Extra Fields in Joomla and K2
- Creating extra fields should often times be left to developers, because the styling component is not easily accessible through the front-end.
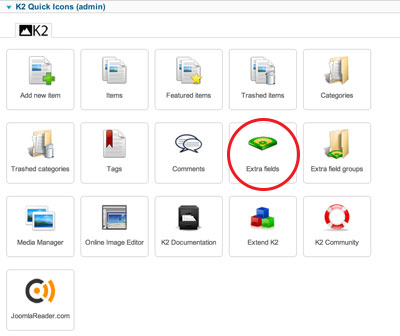
- In order to create extra fields, click on the “Extra Fields” icon in the K2 dropdown menu (shown below in red).
- If you would like to create a new extra field, select the new button (shown below in red). If you would like to edit an existing extra field, select the extra field you would like to edit from the extra field listings (shown below in yellow).
- Unless you know what you are doing, we do not recommend that you edit existing extra field settings.

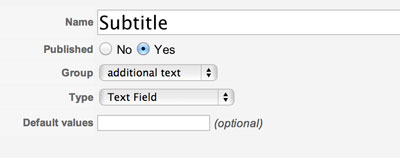
- You should now see a set of fields similar to the one below. Start by defining a name for your extra field and select whether you want your extra field published or not.
- The “Group” field is where you specify whether you want the extra field in an existing group or create a new group. Groups are useful when you want several extra fields to be grouped together. For example, if you wanted a link to your Twitter page along with a link to you Facebook page within one item, you would place these two extra fields in the same “social media” group.
- The “Type” field is where you specify the type of extra field you want.
- After you save your changes using the save button (located towards the upper right hand corner) go to the K2 category listings and select the category you would like to feature your extra fields.
- Under the K2 “Edit Category” screen, you will see an “Associated Extra Field Group” selection (shown below in red). Select the extra field group you would like to be displayed in the given category.

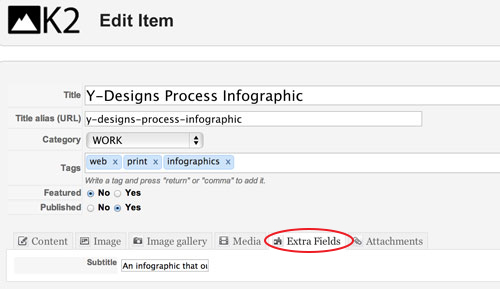
- Now if you access an Item that is featured in the given category, under the “Extra Fields” tab (shown below in red), you will see your newly created extra field! You can edit your extra field content here.