WordPress: Getting started with Custom Post Types
Learn how to integrate Custom Post types into your WordPress site in order to keep your content separated and organized.
In this blog entry we will go over Custom Posts and Taxonomies in the WordPress platform.
What are Custom Post types in WordPress?
Custom Posts in WordPress give you the ability to distinguish different types of content from one another. For example, we may want to distinguish a blog post from an event post, product post, movie post, book post, etc… You get the idea. This is an essential tool for keeping your sites content clean, seperated, and organized.
Why use Custom Post types?
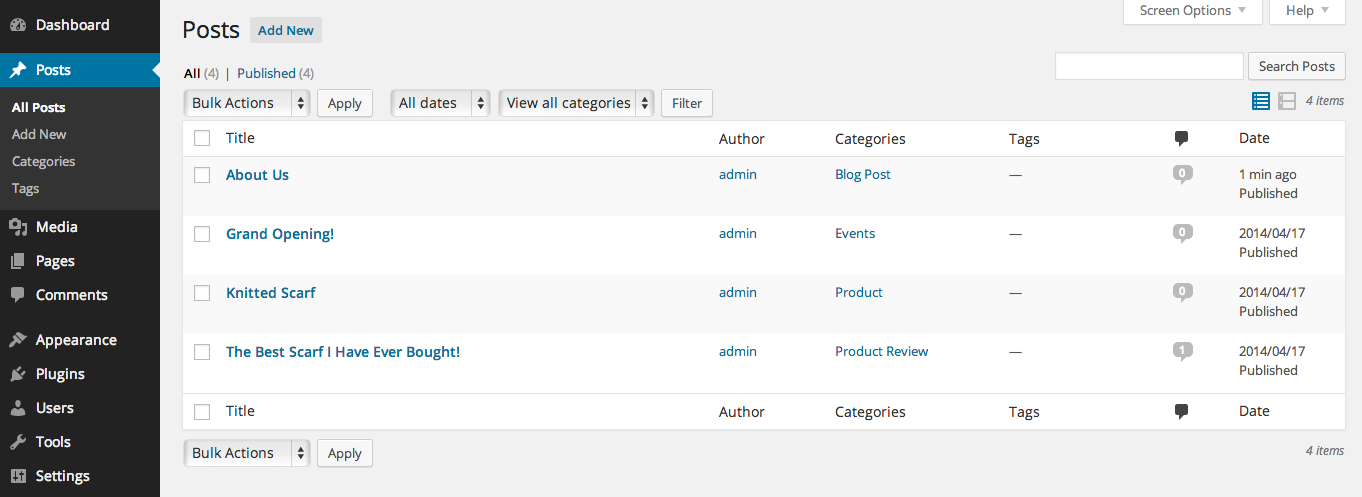
A fresh installation of WordPress gives you two main Post types: ‘post’ and ‘page’. This is a great start for describing our sites content and structure, but you will soon see the benefit of using Custom Post types. Imagine that we are designing a website that needs the following: blog entries, event postings, product listings, and product reviews. The naive approach would be to classify each of these different contents under the ‘post’ type, and then distinguish them by assigning a category for every new post that is made. Looking at our admin page, it is not very clear or intuitive what kind of content our site actually has due to the fact that everything is grouped under “Posts”.

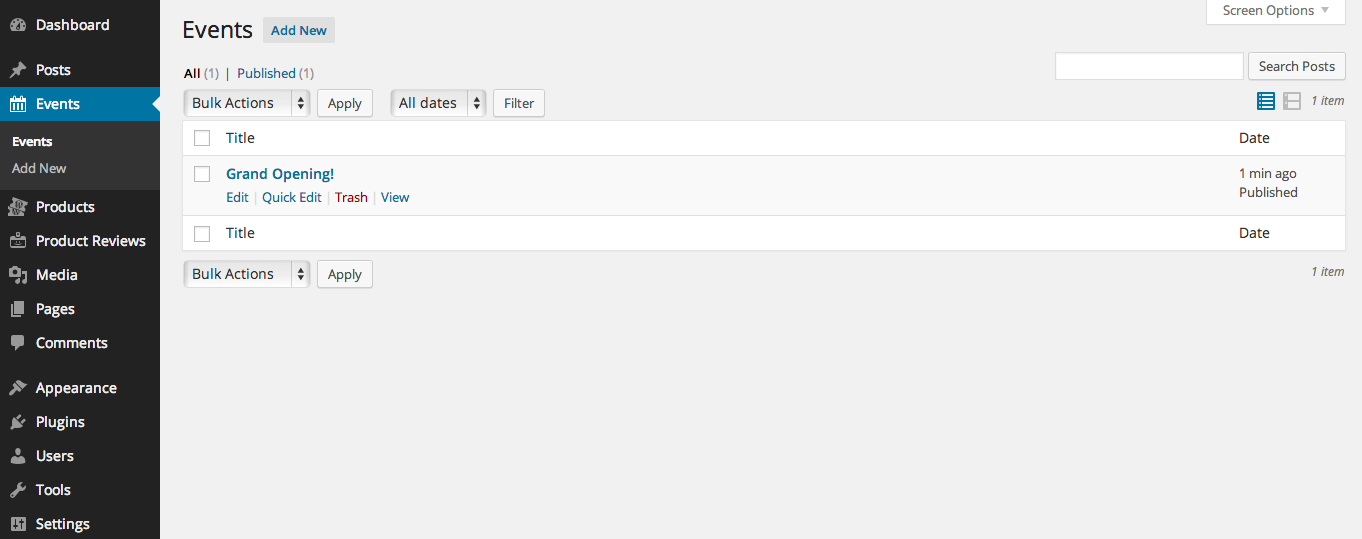
It becomes even more unclear when we start adding sub categories and so on. We can fix this ambiguity through the use of Custom Post types. Compare the following image to the one above. There are now three additional categories in the sidebar: Events, Products, and Product Reviews. Notice how it is very clear the distinction between blog posts, product posts, event posts, and product review posts.

It now makes much more sense to us, as well as a client and/or end user, what sort of content is on the site and how it is seperated. Now if we have several categories of products, for example, we can simply go to Products -> Product Categories in the admin page, as apposed to Posts -> Categories -> Products -> Product Categories (note that adding categories to Products requires a little bit more work).
Getting started with Custom Post types
Using the idea from above, lets create a Custom Post type for our sites “event” postings. In the template directory that we are using for our site, open and add the following to the functions.php file.
function custom_post_type_for_events() { $labels = array( 'name' => _x( 'Events', 'post type general name' ), 'singular_name' => _x( 'Event', 'post type singular name' ), 'add_new' => _x( 'Add New', '' ), 'add_new_item' => __( 'Add New Event' ), 'edit_item' => __( 'Edit Event' ), 'new_item' => __( 'New Event' ), 'all_items' => __( 'All Events' ), 'view_item' => __( 'View Event' ), 'search_items' => __( 'Search Events' ), 'not_found' => __( 'No Events found' ), 'not_found_in_trash' => __( 'No Events found in the Trash' ), 'menu_name' => 'Events' ); $args = array( 'labels' => $labels, 'description' => 'Contains our Events and Event data', 'public' => true, 'supports' => array( 'title', 'thumbnail', 'excerpt' ), 'has_archive' => true ); // 'events' is the name of our Custom Post type, and will be referenced later on. register_post_type( 'events', $args ); } add_action( 'init', 'custom_post_type_for_events' );
Whats going on here? Without going into too much detail, we need to register our Custom Post type within WordPress. Inside the function above are a series of arguments (not a complete listing) that describe what our new post type will look like in the admin interface. It is important to note that there are some restrictions on the naming of our Custom Post types. Avoid using the names of WordPress’s default post types (‘post’, ‘page’, ‘revision’, ‘attachment’, and ‘nav_menu_item’). Also note that the second parameter in the add_action() function must match the name of our first function. If you have added the code above to your function.php file, you have setup a Custom Post type for our events! Go to your admin page and you should now see “Events” listed on the sidebar. For a full list of possible arguments/parameters please refer to the official documentation.
Getting more out of Custom Post types with Custom Taxonomies
Now that we have our first Custom Post type for the events on our site, lets go one step further. Custom Taxonomies sounds kind of confusing, but taxonomies are just a way of classifing of our content. But didnt we just do that with Custom Posts? Yes, We were able to distinguish between several different types of posts (blog, product, product review, and event posts), but taxonomies will let us go one step further. If you have familiarized yourself with WordPress at all, the two main taxonomies used in the default Post type are Categories and Tags. This allows you to add tags or categories to each individual Post. Using our ‘events’ post type as an example, we may want to classify/filter/search those ‘events’ by the type of event, size of event, location of event, the events theme, and so on. We do this by adding Custom Taxonomies. Like before, add the following code to the same functions.php file in your templates directory.
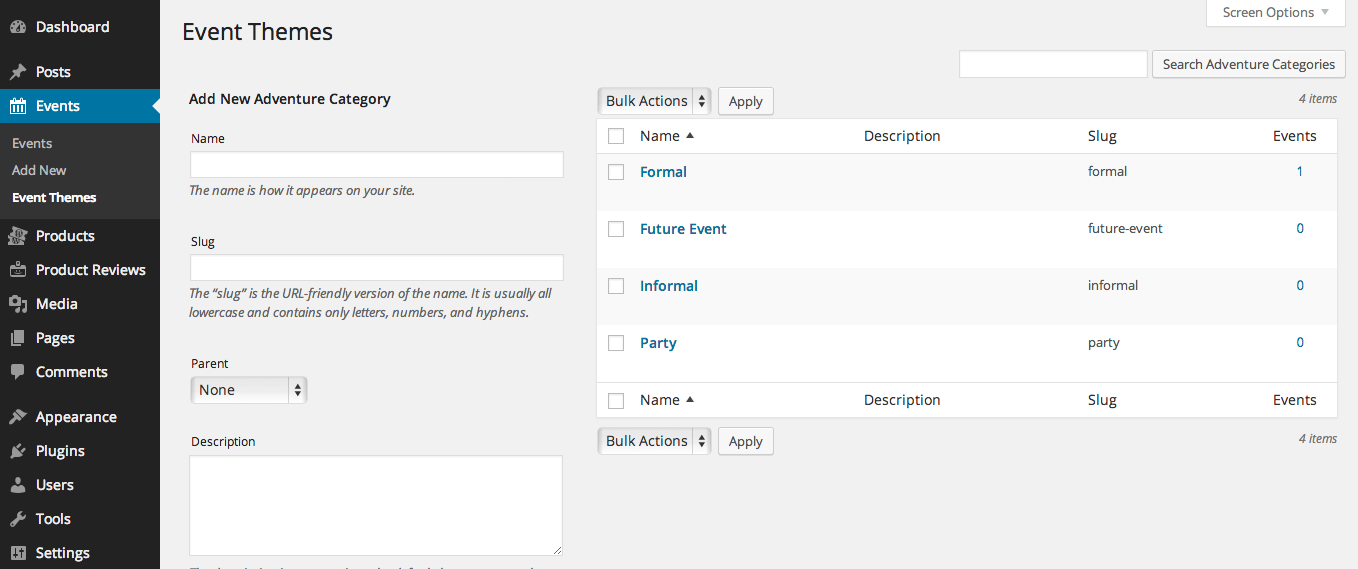
function custom_taxonomy_events_themes() { $labels = array( 'name' => _x( 'Themes', 'taxonomy general name' ), 'singular_name' => _x( 'Theme', 'taxonomy singular name' ), 'search_items' => __( 'Search Event Themes' ), 'all_items' => __( 'All Event Themes' ), 'edit_item' => __( 'Edit Event Themes' ), 'update_item' => __( 'Update Event Themes' ), 'add_new_item' => __( 'Add New Event Theme' ), 'new_item_name' => __( 'New Event Theme' ), 'menu_name' => __( 'Event Themes' ) ); $args = array( 'labels' => $labels ); // Make sure that the second parameter matches the name of your Custom Post type. // In our case, the Custom Post type created earlier was named 'events'. register_taxonomy( 'events_themes', 'events', $args ); } add_action( 'init', 'custom_taxonomy_events_themes', 0 );
That’s it! You have just added a taxonomy to your Custom Post type. Now, for example, when creating an ‘events’ post we can classify the post even further by adding whether the event is formal, casual, a celebration, an event for customers, or however you want to describe the theme of that event. Now it is possible to query for all ‘events’ posts where ‘events_themes’ (the name we gave our custom taxonomy) is equal to “formal”, or whatever we happen to need.

Conclusion
Hopefully this was a basic enough introduction to Custom Post types (and taxonomies) that you understand what they are good for and when you should use them. As a recap, Custom Post types can provide the following benefits to your sites structure/design:
- Differentiate between different types of content. For example: blog posts, events, products, reviews…
- Create a content heirarchy. This was not discused in detail, but Custom Posts allow us to create a better and more formal heirarchy of our content. As an example, we may want to have an Event post type, and then create child post types such as PastEvent post types and FutureEvent post types.
- More intuitive, organized, and user friendly admin page. Hopefully the visuals were enough to get this point accross.
Below are a few links to some additional resources relavent to Custom Post types and Custom Taxonomies in WordPress. Enjoy!
- One (of many) Custom Post type generators: http://generatewp.com/post-type/
- WordPress documentation for Custom Post types: http://codex.wordpress.org/Post_Types#Custom_Post_Types
- WordPress documentation for Custom Taxonomies: http://codex.wordpress.org/Taxonomies#Custom_Taxonomies
