How to Export for Print Using Illustrator
Tutorial by Katy Lee
08.29.2016
Generally files are exported from Illustrator with one of two intentions: print or web. A file optimized for print use will vary drastically from a file optimized for web, and can ultimately have a huge effect on the final quality of the work. This quality is affected largely through selection of color mode, dpi and file format.
Document Profile
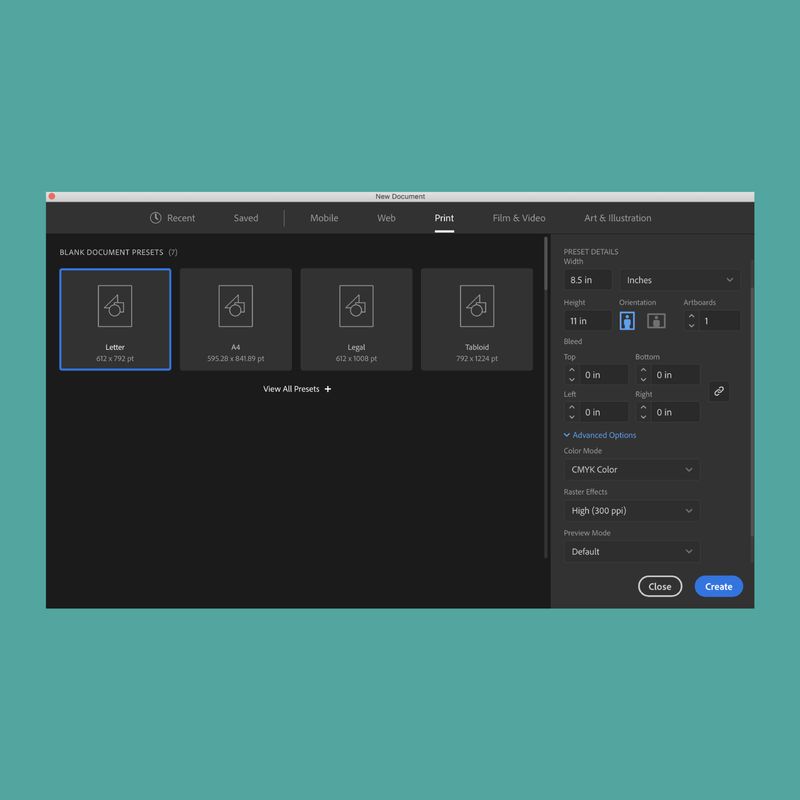
The first step to exporting for print ideally occurs before the work is created, when selecting the document profile. In the “New Document” window, which populates when opening Illustrator or selecting “File”==> “New”, select “print”. You will notice this automatically changes multiple settings listed under “Advanced” including the Document Color Mode (CMYK)* and the PPI (300)** . *The color mode CMYK stands for Cyan, Magenta, Yellow and Key (black). These are the four colors of ink inside a printer. Because printers mix these four colors to create every color printed, coloring will be more accurate if you give the printer a document generated from the same colors. (Computer screens, on the other hand, create all color through the use of Red, Green and Blue. Therefore, RGB is best when exporting for web.) **300 PPI (pixels per inch) is an ideal resolution for print. If a document contains fewer than 300 pixels per inch, the pixels themselves may be visible in the final print, meaning the print will be pixelated. (Web requires significantly fewer PPI, only 72.)Changing the Document Profile
If you have already created a document with the wrong profile and wish to change it, you must manually change the color profile and the resolution. Select “Edit”==>”Document Color Mode”==>”CMYK” to change the color profile. Select “Effect”==> “Document Raster Effect Settings…”, select 300ppi from the Resolution drop-down menu in the window that populates.
Saving/File Format
An ideal file format for printing a document created in Illustrator is a PDF. PDFs will be larger than many other options, but will also provide the printer with more information. This file will also not lose quality over time and use. To save a PDF, select “File”==> “Save as…”, this will open the Save As dialog box. Select “Adobe PDF” from the “Format” drop-down menu. Don’t forget to navigate to an appropriate file location and name the file before selecting “Save” in the bottom right-hand corner of the dialog box.A “Save Adobe PDF” dialog box will now open. Don’t worry, you’re almost there! This dialog box contains many options, the easiest of which being to select “Press Quality” from the “Adobe PDF Preset” drop-down menu. To reduce the file size as much as possible, you can un-check “Preserve Illustrator Editing Capabilities.” Select “Save PDF” in the bottom right-hand corner of the dialog box.
Ta-da! You now have a PDF saved for optimal printing quality. To learn more about exporting from Illustrator, check out our other tutorials.
